Sep 23, 2022

k8s Services

A Kubernetes service enables network access to a set of pods. A service listens on a local port (services.spec.ports.port) and forward them to the selector (services.spec.selector) pods at the target port (services.spec.ports.targetPort). Since pods are ephemeral, a service enables a group of pods, which provide specific functions like web service to be assigned a name and unique IP address (clusterIP)

ClusterIP – The service is only accessible from within the Kubernetes cluster.

NodePort – This makes the service accessible on a static port (high port) on each Node in the cluster. Each cluster node opens a port on the node itself and redirects traffic received on that port to the underlying service. 

LoadBalancer – The service becomes accessible externally through a cloud provider's load balancer functionality. If you inspect the load balancer, you will notice that nodes will be instances where the traffic will be redirected at a specific Instance Port, so you should be able to access the application using the node port

Get Instance Port - kubectl get svc <svc name> -o jsonpath="{.spec.ports[0].nodePort}" 

Get Node IP - kubectl get node -o wide

Ingress

Loadbalancer is the default method for many k8s installations in the cloud, but it adds cost and complexity as every service needs to have its own cloud-native load balancer and hence increased the cost. Along with this, you may need to handle SSL for each application, which can be configured at different levels- like application level, load balancer level, etc and also configure firewall rule. This is where an ingress helps. You can consider this as a layer 7 load balancer that is built in a k8s cluster which can be configured as a k8s object using YAML just like any object. Now even with this you still need to expose this to the outside world load balancer (or may be node port), but that's just going to be a single cloud-native load balancer and all the routing will be configured through the ingress controller.

K8s cluster does not come with an ingress controller by default. There is multiple ingress controller available like AWS Load Balancer Controller, GLBC, and Nginx which are currently being supported and maintained by the k8s project. Along with this Isio is also a popular one that provides a lot of service mesh capabilities. An ingress resource is a set of rules and configurations to be applied to the ingress controller. 

Jun 21, 2022

Argo CD

Argo CD is a declarative, GitOps continuous delivery tool for Kubernetes. This is based on the pull mechanism. You can configure  Argo CD using the following steps after which argocd agent pulls manifest changes and applies them

  • Deploy ArgoCd to K8s cluster. Refer this for more details
  • Create a new Application in ArgoCd either through the command-line tool or the UI or using YAML of custom type Application. Here you connect the source repository to the destination k8s server.

In a typical CI/CD pipeline, when you make a code change, the pipeline will test, build, and create the image, push the image to the hub, and update the manifest file (like update deployment with a new image tag). At this stage, the CD will apply the new manifest to the k8s cluster using tools like kubectl or helm on the cd runner. For CD to work, it need to have access to the k8s and also to the cloud, like AWS. This may have a security concerns as you need to give cluster credentials to an external tool. This can even get more complicated if you have multiple applications from different repositories being deployed to different k8s. Also once you apply the manifest, you do not have direct visibility of the status of the configuration change. These are some of the challenges that gitops tools like Argo CD address as the CD is part of k8s cluster.  Here are some of the benefits of using gitops tool like like Argo CD
  • Source Repository is a single source of truth. Even if someone makes manual changes, Argo CD will detect the actual state (in k8s cluster) to be different than the desired state (application config git repo). You can always disable this by setting it to manual. 
  • Rollback is just a matter of reverting code in the repository.
  • Disaster recovery is easy as you can apply this to any destination. 
  • No cluster credential outside of k8s.
  • This is an extension to k8s API as it uses Kubernetes resources itself like etcd to store data, controller for monitoring/controlling actual state to the desired state. It can be configured using YAML as a custom resource.


It's a good idea to have a separate repo for application code and application config (manifest files). This way you can make configuration changes like updates to config maps without involving the application pipeline. In this case, your application pipeline should perform the following - test, build and push the image and then update the manifest file in the configuration repository after which Argo CD will find that the source and destination are not in sync, so it will apply changes from the source. 

At the time of writing, I ran into some challenges while running Argo Cd on eks fargate profile, but no issues with eks node group.

Sep 22, 2021

kubernetes high level overview

Kubernetes is an open-source system for automating deployment, scaling, healing, networking, persistent storage options, and management of containerized applications. It provides features like Service Discovery, Load Balancing, Storage Orchestration, Automates Rollout/Rollback, Self-healing, Secret and Configuration Management, Horizontal Scaling, Zero downtime deployment, blue-green, canary, Run like the production on the development machine. 

It consists of one or more master nodes that will manage one or more worker nodes that together work as a cluster. The master node will start something call pod on the worker node, which is a way to host container. You will need a Deployment/replica set to deploy the pod. Kubernetes does not deploy the container on a worker node, but it encapsulates it within a kubernetes object called pods. One pod will contain only one same type application container, but you can have different type application containers running in the same pod, like the front end and middle-tier container running in the same pod. In this case, the two containers can talk using localhost since they share the network space and also they share storage space.

Master Node Components (collectively known as the control plane)

API Server - This acts as a front-end to the Kubernetes, users, management devices, command-line interface which talks to the API Server to interact with  Kubernetes.

ETCD store - It's a  key-value pair database that stores information about the cluster

Scheduler -  Responsible for distributing work or containers across nodes. It looks for a newly created container and assigns it to the node. node/pod running comes to life or goes away.

Controller - They are responsible for processing and responding when Node/container goes down, it makes a decision to bring up a new container. They are the brain behind the orchestration.

Worker node components (collectively known as the data plane)

Container Runtime - Underlying software which is used to run container.. like docker, rocket, etc

Kubelet - It's an agent which runs on each node in the cluster, agent is responsible for making sure that the container is running as expected. It runs on the node which registers that node with the cluster to report back and forth with the master node.


Kubectl Explain

Kubectl Explain is a handy command to List the fields for supported resources and also get detailed documentation around that. Its a good way to explore any kind of k8s object. Refer following for few example. Also refer kubectl-commands and cheatsheet 

kubectl explain deployment.spec.strategy.rollingUpdate

kubectl explain deployment.spec.minReadySeconds

kubectl explain pod.spec.tolerations

kubectl explain pod.spec.serviceAccountName

kubectl explain pod.spec.securityContext

kubectl explain pod.spec.nodeSelector

kubectl explain pod.spec.nodeName

kubectl explain pod.spec.affinity

kubectl explain pod.spec.activeDeadlineSeconds

kubectl explain job.spec.

kubectl explain job.spec.ttlSecondsAfterFinished

kubectl explain job.spec.parallelism

kubectl explain job.spec.completions

kubectl explain job.spec.backoffLimit

kubectl explain job.spec.activeDeadlineSeconds


If you want to get more familiar with the imperative way of creating k8s resources refer CKAD Exercises as they can be useful during the CKAD exam. The imperative way of creating resources sometimes saves time which is critical in the exam. You can always patch or edit the resource if that's allowed. 


Apr 12, 2021

Snowflake Introduction

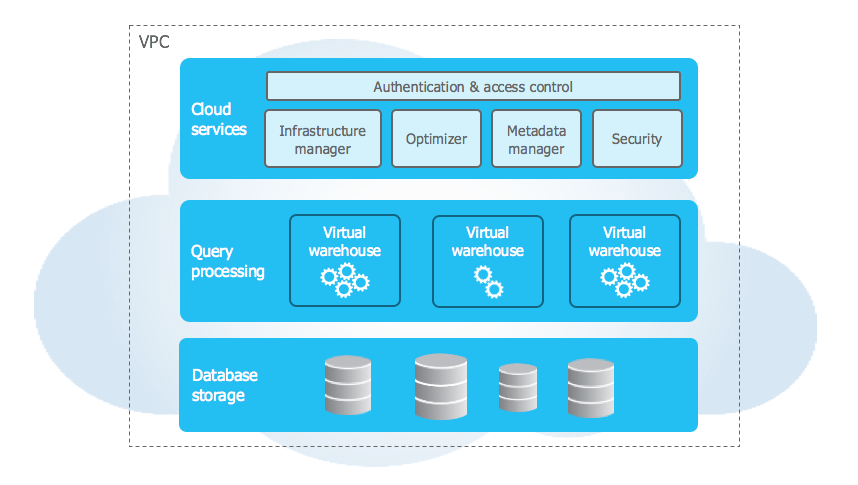
Snowflake is a Fully Managed cloud data platform. This means that it provides everything you need to build your data solution, such as a full-feature data warehouse. It is cloud-agnostic and most importantly you can even replicate between the clouds. 

The architecture comprises a hybrid of traditional shared-disk and shared-nothing architectures to offer the best of both. 

The storage layer organizes the data into multiple micro partitions that are internally optimized and compressed. Data is stored in the cloud storage (storage is elastic) and works as a shared-disk model thereby providing simplicity in data management. The data objects stored by Snowflake are not directly visible nor accessible by customers; they are only accessible through SQL query operations run using Snowflake. As the storage layer is independent, we only pay for the average monthly storage used.

Compute nodes (Virtual Warehouse) connect with the storage layer to fetch the data for query processing. These are Massively Parallel Processing (MPP) compute clusters consisting of multiple nodes with CPU and Memory provisioned on the cloud by Snowflake. These can be started, stopped, or scaled at any time and can be set to auto-suspend or auto-resume for cost-saving. 

Cloud Services Layer handles activities like authentication, security, metadata management of the loaded data, and query optimization

Data is automatically divided into micro-partitions and each micro-partition contains between 50 MB and 500 MB of uncompressed data. These are not required to be defined upfront. Snowflake stores metadata about all rows stored in a micro-partition.Columns are stored independently within micro-partitions, often referred to as columnar storage. Refer this for more details. 

In addition to this, you can manually sort rows on key table columns, however, performing these tasks could be cumbersome and expensive. This is mostly useful for very large table

May 6, 2020

SNS

SNS is the notification service provided by AWS, which manages the delivery of a message to any number of subscribers. It uses the publisher/subscriber model for push delivery of messages. Subscribers are notified using following supported protocols - SQS, lambda, http/s, email, SMS. 

To use SNS, you create a topic and define a policy that dictates who can publish and subscribe to it. You can define policy by configuring the condition to give cross-account access. An SNS request has a Topic where you want to publish to, Subject, Message, MessageAttributes, MessageStructure. 

The subscriber can define subscription filter policy and dead-letter queues. By configuring the subscription filter policy, you can filter the message to be sent to the subscriber based on rules defined on the message attribute. You can assign a redrive policy to Amazon SNS subscriptions by specifying the Amazon SQS queue that captures messages that can't be delivered to subscribers successfully. You can test this by deleting the endpoint like lambda function. 

When you configure dead letter Q, you need to make sure, that SNS has the necessary permission to publish the message to the Q, by adding permission policy in SQS with SNS earn. Once a message is in dead letter Q, you can either have lambda configured to process them and also use cloud watch metrics to monitor dead letter Q.

SNS -> Lambda vs SNS -> SQS -> Lambda

If you have SQS in between SNS and Lambda, it can give you the flexibility of reprocessing. You may be able to set Redrive policy for SQS and set Maximum Receives, which essentially means the message will be received by lambda that many numbers of times before being sent to the dead letter Q. If no Redrive policy is set, then after every visibility timeout, the message will be sent to the lambda, until the message retention period. In case when SNS directly sends the message to lambda, its only one time, and if it fails it will get sent to the dead letter Q if Redrive policy is set. With SQS you can have a retention period of at least up to 14 days.

SQS retry happens after the visibility timeout occurs and the visibility timeout should be more than lambda timeout which essentially makes sure the message is sent to lambda only after lambda processing is completely done, which prevents duplicate processing of the message.

In Sqs (Pull Mechanism) messages are persisted for some (configurable) duration if no consumer is available, whereas in Sns (Push Mechanism) messages are sent to the subscribers which are there at the time when the message arrives.


Apr 14, 2020

React Introduction

React helps you build encapsulated components that manage their state, then compose them to make complex UI. The component has Props & State which represents its model. The data flow one way down the component hierarchy. 

state => view => action => state => view

View


The view is the direct result of rendering DOM using ReactDOM.render from the react-dom package. For a given model the DOM will always be the same, so the only way to change DOM is to change the model. Once a model is rendered in DOM, it can generate events that feedback into the state and trigger another render cycle. Once a state is changed react will render DOM. A state is always owned by one Component. Any data that’s affected by this state can only affect Components and its children. Changing state on a Component will never affect its parent, or its siblings, or any other Component in the application.

For efficient rendering, React maintain its document obstruction. A component render function updates this fake document object model known as the virtual DOM which is extremely fast. Once that happens react compares the fake document object model to the real document object model and update the real document object model in the most efficient way possible. Updating DOM is an expensive operation as redrawing large sections of DOM is inefficient. The comparison of virtual DOM with a real document happens in memory. 

ReactDOM takes two arguments: the first argument is JSX expression and the 2nd argument is dom element, this is the place where the react component will be inserted into the DOM element.

JSX


It's an XML like syntax extension to javascript which is used to describe how UI will look like. You can put any valid JavaScript expression inside the curly braces in JSX. Since the browser doesn't understand JSX, so it must be compiled to javascript, which is handled by bable. You may have an option to write directly the javascript and not JSX, but that may not be easier to write/read/maintain. If you are interested you can use https://babeljs.io/ to see how JSX is compiled to javascript. Writing HTML in javascript looked a little weird if you come from the angular background, but if you really think even in angular you write javascript in angular HTML like ngFor, etc. So either way, you have one of the two options - write js in HTML or HTML in js. One advantage I see with HTML in js is that at compile time you can catch an error. There are few minor differences between JSX and HTML like className for class and htmlFor for for. JSX can represent two types of element

  • DOM tag like div, dom tags are written in lower case, attributes passed to these elements are set on rendered DOM
  • User definer element must be starting with a capital letter. attributes to user-defined elements are passed to the component as a single object, usually referred to as props. All react components must act like pure functions with respect to their props, for a given prop output should be same and component needs to be rendered only if prop changes

Props and State


Props is short for properties. It allows you to pass data to the child component. Props are immutable as they are passed down from parent to child, so they are owned by the parent, so you cannot change it. On the other hand, the state is used to hold data that your component need to change for example value of the text field. To update state you use setState

Event


React events (called synthetic event) are very similar to dom events, with few minor differences like name with camel case compare to lower case and function being passed as event handler rather than string. To prevent default you need to call preventDefault on the event object. SyntheticEvent are cross-browser wrapper around the browser’s native event. You can access browser native event by accessing nativeEvent. Since data flow one way, the only way to pass data is to raise event and update state which will eventually trigger view update. The same way you can pass data to the parent component, by calling function passed in the props.

Angular vs React

Both are component-based platform-agnostic rendering frameworks/tools, which you can write using typescript or javascript.

Data Binding
Angular uses two-way data binding which helps write less boilerplate code to have a model and view in sync. React supports one-way data binding which makes debugging easier and maybe help in performance

Architecture
Angular is a full-blown framework that includes DI, forms, routing, navigation, HTTP implementation, directives, modules, decorators, services, pipes, templates with few advanced features like change detection, Ahead-of-Time compilation, lazy loading,  and Rx.js. This is built into core of the framework. React is much simple and you will have to use other libraries like redux, react-router, etc to make a complex application. React has a wider range of material design component libraries available.

CLI
Angular cli is a powerful command-line interface that assists in creating apps, adding files, testing, debugging, and deployment. Create React App is a CLI utility for React to quickly set up new projects


Mar 11, 2020

Running .NET Core 3.1 on AWS Lambda

AWS Lambda supports multiple languages through the use of runtimes. To use languages that are not natively supported, you can implement custom runtime, which is a program that invokes the lambda function's handler method. The runtime should be included in the deployment package in the form of an executable file named bootstrap. Here is the list of things which you need to do in order to run a .NET Core 3.1 on AWS lambda.

bootstrap

Since this is not a supported runtime, you need to include a bootstrap file which is a shell script that Lambda host calls to start the custom runtime.
#!/bin/sh
/var/task/YourApplicationName

Changes to project file

You need a couple of NuGet packages from Amazon.LambdaAspNetCoreServer and RuntimeSupport. AspNetCoreServer provides the functionality to convert API Gateway’s request and responses to ASP.NET Core’s request and responses and RuntimeSupport provides support for using custom .NET Core Lambda runtimes in Lambda

<PackageReference Include="Amazon.Lambda.AspNetCoreServer" Version="4.1.0" />
<PackageReference Include="Amazon.Lambda.RuntimeSupport" Version="1.1.0" /> 

Apart from that, you need to make sure to include bootstrap in the package and change the project output type to exe.

<OutputType>Exe</OutputType>

<ItemGroup>
    <Content Include="bootstrap">
      <CopyToOutputDirectory>Always</CopyToOutputDirectory>
    </Content>
</ItemGroup> 

Add Lambda entry point

This class extends from APIGatewayProxyFunction which contains the method FunctionHandlerAsync which is the actual Lambda function entry point. In this class override the init method where you need to configure startup class using the UseStartup<>() method. If you have any special requirements, you can use FunctionHandlerAsync, where you can write your own handler. One example will be lambda warmer, where you don't want the actual code to be executed, rather you would want to respond directly from this method. The following code snippet is just for reference purpose, with provisioned concurrency supported in AWS lambda, you can achieve the same


public override async Task<APIGatewayProxyResponse> FunctionHandlerAsync(APIGatewayProxyRequest request, ILambdaContext lambdaContext)
        {
            if (request.Resource == "WarmingLambda")
            {
                if (string.IsNullOrEmpty(containerId)) containerId = lambdaContext.AwsRequestId;
                Console.WriteLine($"containerId - {containerId}");

                var concurrencyCount = 1;
                int.TryParse(request.Body, out concurrencyCount);

                Console.WriteLine($"Warming instance { concurrencyCount}.");
                if (concurrencyCount > 1)
                {
                    var client = new AmazonLambdaClient();
                    await client.InvokeAsync(new Amazon.Lambda.Model.InvokeRequest
                    {
                        FunctionName = lambdaContext.FunctionName,
                        InvocationType = InvocationType.RequestResponse,
                        Payload = JsonConvert.SerializeObject(new APIGatewayProxyRequest
                        {
                            Resource = request.Resource,
                            Body = (concurrencyCount - 1).ToString()
                        })
                    });
                }
                
                return new APIGatewayProxyResponse { };
            }
        
            return await base.FunctionHandlerAsync(request, lambdaContext);

        }

Update Main function

In NET Core 2.1 which is native Lambda runtime, the LambdaEntryPoint is loaded by Lambda through reflection(through the handler configuration) but with custom runtime, this needs to be loaded by the main function. To make sure the ASP.NET Core project works locally using Kestrel, you can check if AWS_LAMBDA_FUNCTION_NAME environment variable exists.


if (string.IsNullOrEmpty(Environment.GetEnvironmentVariable("AWS_LAMBDA_FUNCTION_NAME")))
{
CreateHostBuilder(args).Build().Run();
}
else
{
var lambdaEntry = new LambdaEntryPoint();
var functionHandler = (Func<APIGatewayProxyRequest, ILambdaContext, Task<APIGatewayProxyResponse>>)(lambdaEntry.FunctionHandlerAsync);
using (var handlerWrapper = HandlerWrapper.GetHandlerWrapper(functionHandler, new JsonSerializer()))
using (var bootstrap = new LambdaBootstrap(handlerWrapper))
{
bootstrap.RunAsync().Wait();
}
}

Add defaults file

.NET Lambda command-line tools and VS deployment wizard use a file called aws-lambda-tools-defaults.json for settings to use for packaging Lambda project into a zip file ready for deployment and for deployment. Deployment under the hood uses cloud formation. Run following to explore more about tool
dotnet lambda help

Cli Command

dotnet lambda package --output-package lambda-build/deploy-package.zip
dotnet lambda help